Contents
Documentation
What is GPX.sh
GPX.sh is a simple, privacy-focused platform for managing your GPX files. We believe your data should be under your control, with no vendor lock-in or complex proprietary formats. Upload your GPS tracks, share them with anyone, and edit them with our powerful built-in editor.
Key Features
- Upload & Store - Securely store your GPX files in the cloud
- Share Anywhere - Generate unique links to share your routes with anyone
- Interactive Viewer - View files on beautiful interactive maps
- Powerful Editor - Edit tracks, routes, and waypoints with precision
- Create from Scratch - Design new routes directly in your browser
Have questions? Check out our Frequently Asked Questions.
About the GPX Format
GPX (GPS Exchange Format) is an open XML-based format for storing GPS data. It's the most widely used standard for exchanging location data between devices and applications.
Compatible Devices
- GPS Units - Garmin, Magellan, TomTom, and other handheld devices
- Fitness Trackers - Garmin watches, Polar devices, Suunto units
- Smartphones - Apps like Strava, Komoot, AllTrails, and many others
- Bike Computers - Garmin Edge, Wahoo, Hammerhead, Bryton
- Action Cameras - GoPro and similar devices with GPS logging
Common Use Cases
- Hiking - Record and share trail routes
- Cycling - Plan bike routes and track rides
- Running - Log training routes and race courses
- Navigation - Create waypoints and planned routes for GPS devices
- Travel - Document journeys and points of interest
Important Note
GPX.sh is not affiliated with, endorsed by, or connected to TopoGrafix or the GPX standard maintainers. GPX.sh is simply a platform that works with files in the GPX format. The GPX specification is an open standard maintained by TopoGrafix.Your Account
Getting Started
Creating an account on GPX.sh is quick and free. Simply provide your name, email address, and create a password. A confirmation email will be sent to verify your email address.
Registration Process
- Navigate to the registration page
- Enter your name, email address, and password
- Click "Create Account"
- Check your email for a verification link
- Click the link to verify your account
All Features Included
Every feature on GPX.sh is available to all users. The difference between free and premium plans is in the storage limits and support options, not the functionality. You can upload, edit, share, and view files on any plan.
Free vs Premium
| Feature | Free | Premium |
|---|---|---|
| Storage space | 100 MB | 300 MB |
| Maximum file size | 2 MB | 5 MB |
| Email support | ||
| Mobile apps access |
You can upgrade to Premium at any time from the Plans page in your account.
My Files
The My Files section is your central hub for managing all your GPX files. Here you can view, organize, edit, and share your uploaded and created files.
Files Section
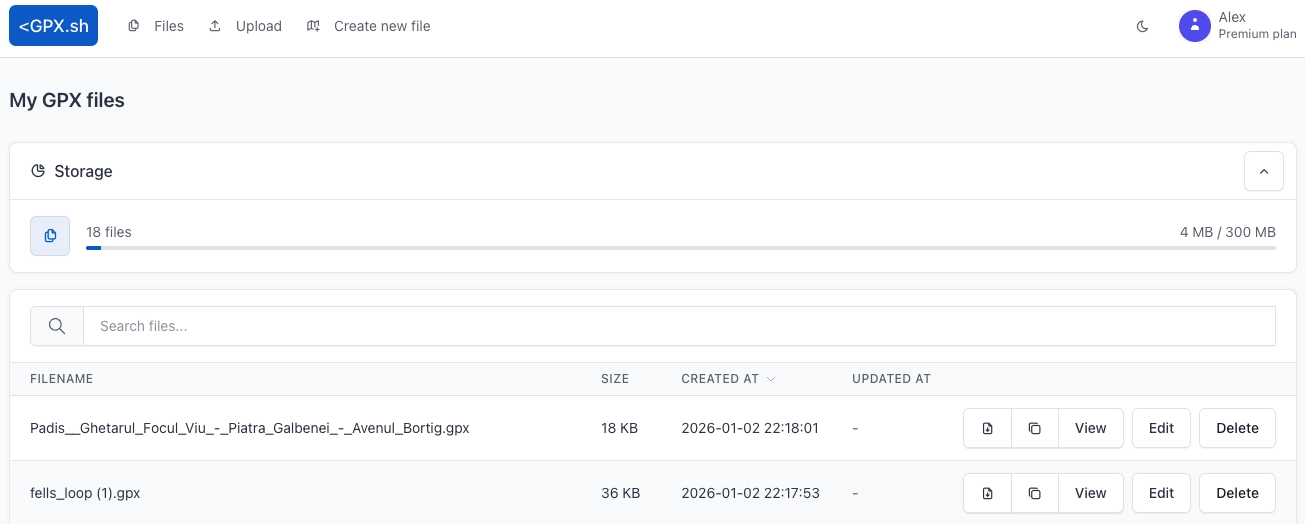
The Files section displays all your GPX files in a convenient table format with powerful organization tools.
Sorting & Searching
- Sort by - Click column headers to sort by filename, file size, created date, or updated date
- Search - Use the search box to filter files by filename
- Pagination - Choose to display 10, 20, or 30 files per page
Table Actions
Each file row has action buttons:
- Download - Downloads the GPX file to your device
- Copy URL - Copies the viewer link to your clipboard
- View - Opens the file in the interactive viewer (new tab)
- Edit - Opens the file in the editor (desktop only)
- Delete - Removes the file after confirmation
Upload Errors
Files that failed processing are highlighted and do not show View or Edit actions. You can delete them and re-upload a valid GPX file.
Deleted Files
If you delete a file by mistake, use the Undo link shown after deletion to restore it immediately.
Storage Quota
Your storage usage is displayed at the top of the files section, showing used space, total available space, and a visual progress bar.
Sharing & Viewer

How Sharing Works
Every GPX file you upload or create receives a unique 10-character code. This code is used to generate a shareable link that anyone can use to view your route, no account required.
Share URL format: https://gpx.sh/v/{code}
Download URL format: https://gpx.sh/d/{code}
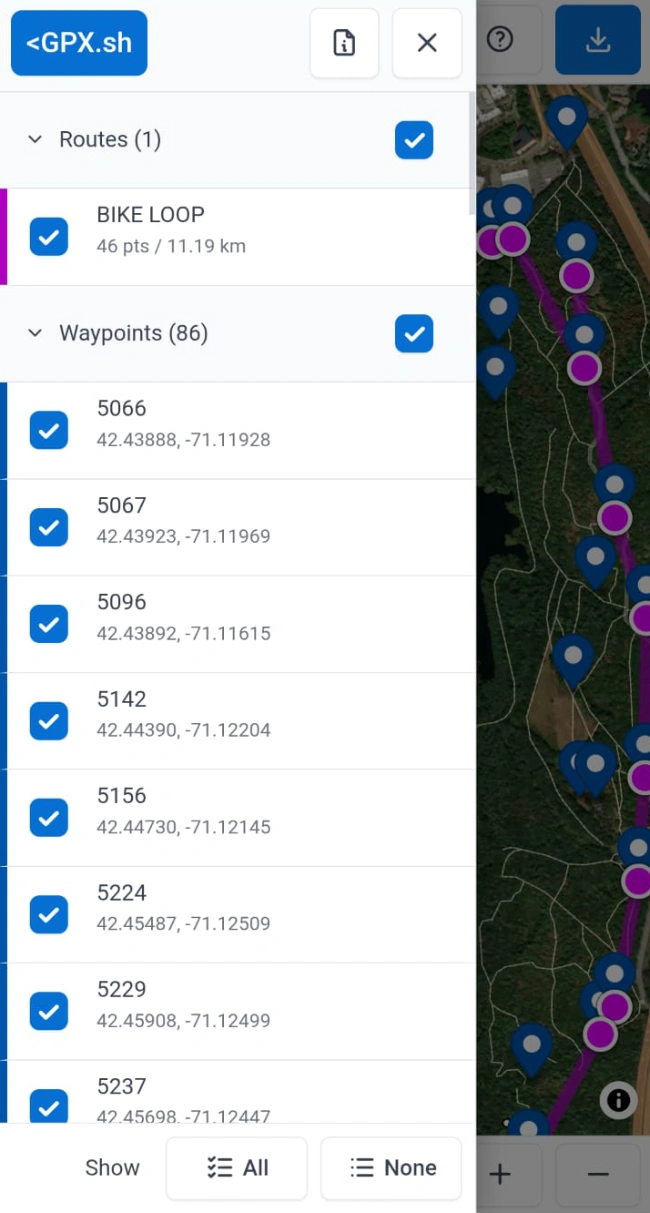
Viewer Features
The viewer app provides a rich, interactive experience for exploring GPX files:
- Interactive Map - Pan, zoom, rotate, and tilt the map to explore routes
- Element Visibility - Toggle visibility of individual tracks, routes, and waypoints
- Show All / None - Toggle all elements at once from the sidebar footer
- File Metadata - View file information including name, description, and author
- Download - Download the original GPX file
Privacy
Share links use randomly generated codes that are difficult to guess. Only people with the link can access your files. For additional privacy, you can delete files at any time to remove public access.
Navigation & Settings
Navigate the map by clicking and dragging to pan, scrolling to zoom, or holding Ctrl while dragging to rotate. For 3D perspective, hold Ctrl + Shift and drag to tilt. The settings panel lets you switch between metric and imperial units, toggle light or dark theme, choose map styles (streets, satellite, outdoors), and enter fullscreen mode. On mobile devices, you can enable location tracking to show your position on the map, follow your location automatically, center on yourself, reset north orientation, and adjust zoom using the toolbar controls.
Mobile Viewer

Mobile GPX viewer - Caption 1
Mobile GPX viewer - Caption 2
The viewer is fully optimized for mobile devices with touch-friendly controls and a dedicated toolbar.
Touch Controls
- Pan - Drag with one finger to move the map
- Zoom - Pinch with two fingers to zoom in or out
- Rotate - Twist with two fingers to rotate the map
- Tilt - Drag up or down with two fingers for 3D perspective
Footer Toolbar
A dedicated toolbar at the bottom of the screen provides quick access to common actions:
- Follow Location - Auto-center on your position as you move (requires location tracking)
- Center on Me - Center the map on your current location once
- Reset North - Reset the map orientation to face north
- Zoom In/Out - Adjust the zoom level
Location Tracking
Enable "Show my location" in settings to display your current GPS position on the map. You can also enable "Show accuracy circle" to see the precision of your GPS signal. Choose your preferred location accuracy mode:
- Precise - Most accurate tracking, uses more battery
- Balanced - Moderate accuracy and battery usage
- Power Saver - Conserves battery, less frequent updates
Tips
- Use landscape orientation for a wider map view
- Tap outside panels to close them
- The screen stays awake while location tracking is enabled
Upload
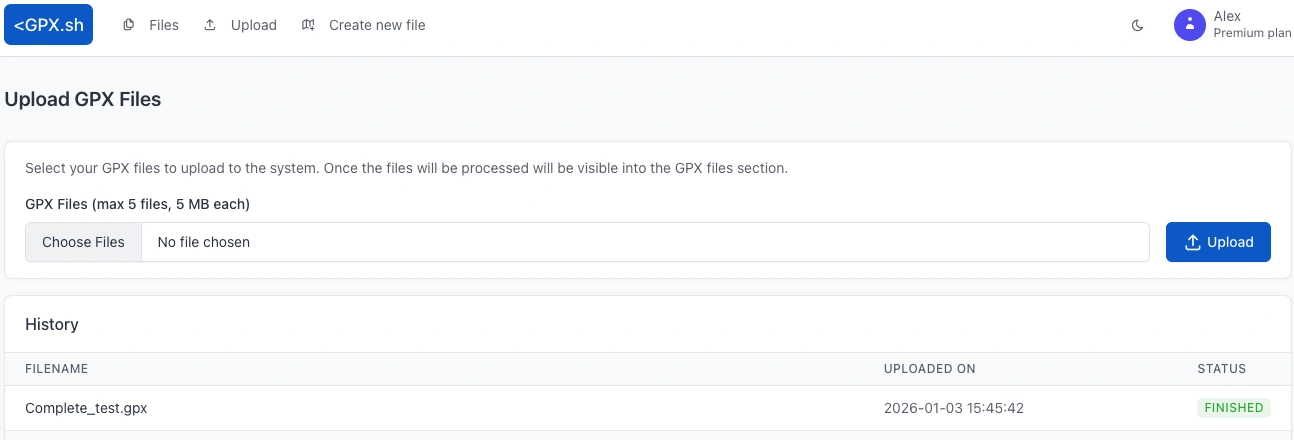
Uploading Files
Upload GPX files from your computer, GPS device, or any other source. Files are validated and processed immediately, and successful uploads appear in your Files section.
How to Upload
- Go to the Upload page
- Click to choose one or more GPX files
- Wait for the upload to complete
- Files appear in your Files section
Batch Upload
You can upload multiple files at once (up to 5). Select multiple files in the file picker and upload them together.
File Requirements
- Format - Files must be valid GPX (XML) format
- Size limit - 2 MB per file (free) or 5 MB per file (premium)
- Storage limit - Uploads are blocked when your storage quota is exceeded
Upload History & Status
The History table shows recent uploads and their status: New, Processing, Finished, or Error.
Upload Failures
Some uploads may fail if the file is malformed or doesn't conform to the GPX specification. If an upload fails, check that your file is a valid GPX file and try again.
Editor

The GPX Editor is a powerful tool for creating and modifying GPX files. It produces valid GPX 1.1 files while prioritizing the most-used fields; advanced point-level metadata and extensions aren't editable in the UI. Whether you're cleaning up a recorded track, planning a new route, or marking points of interest, the editor has the tools you need.
GPX Elements
Understanding the structure of GPX files:
- Track (trk) - A recorded path, typically from GPS logging. Contains one or more segments.
- Segment (trkseg) - A continuous sequence of track points within a track. A track may be split into multiple segments when the GPS signal was lost or recording was paused.
- Route (rte) - A planned navigation path defined by ordered waypoints. Unlike tracks, routes represent intended paths rather than recorded ones.
- Waypoint (wpt) - A single point of interest with coordinates and optional metadata such as name, description, and elevation.
Header Controls
- File name - Edit the filename. The
.gpxextension is added automatically if missing. - Meta - Edit GPX 1.1 metadata including name, description, author information, copyright, links, creation time, and keywords.
- Import - Import tracks, routes, or waypoints from another GPX file. Select which elements to include.
- Settings - Configure measurement system (metric/imperial), appearance (light/dark), map type, element visibility, and elevation fetching for new waypoints.
- Help - Toggle the quick help panel.
- Close - Close the editor. Prompts if there are unsaved changes.
- Save - Save the current file.
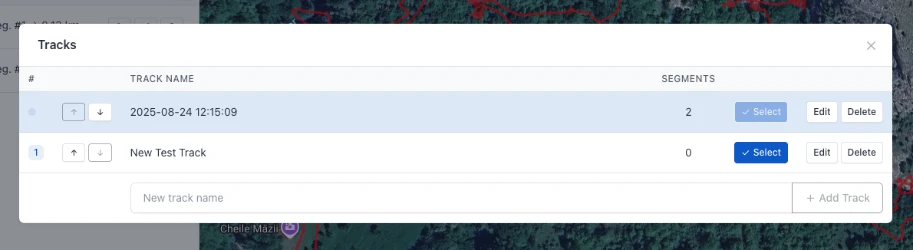
Track Management
The Tracks tab in the sidebar manages your tracks and their segments.
Managing Tracks
Click to open track management where you can:
- Select a track to make it active
- Create new tracks
- Rename existing tracks
- Delete tracks
- Reorder tracks using the up/down controls
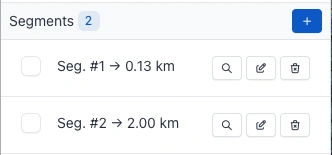
Segment List
Shows segments of the active track. Each segment has action buttons:
- Locate - Center the map on this segment
- Edit - Start editing the segment
- Delete - Remove the segment
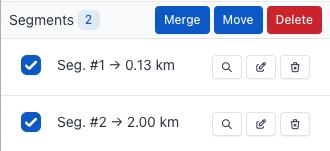
Select multiple segments using checkboxes for bulk operations:
- Merge - Combine selected segments into one
- Move - Move segments to another track
- Delete - Remove all selected segments
Segment Editing
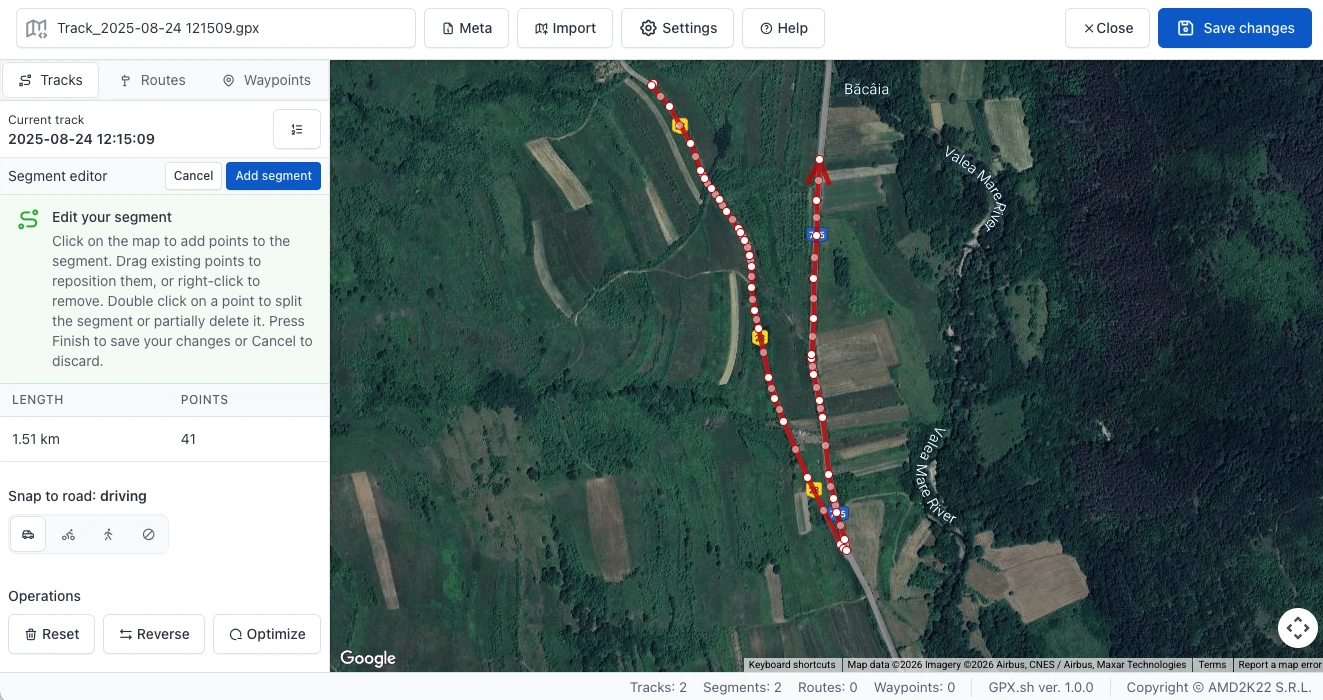
Click to create a new segment or to edit an existing one.
Adding Points
Click on the map to add points to your segment. Points are connected in sequence to form a path. The arrow at the end of the editable line indicates the direction of the segment, which can be reversed using the Reverse tool.
Editing Points
Snap to Road
Enable snap-to-road to automatically align new points to road networks. Choose from:
- Driving - Follow car-accessible roads
- Bicycling - Follow bike-friendly routes
- Walking - Follow pedestrian paths
- Disabled - Direct point-to-point lines
Point Operations
- Move - Click and drag any point on the line to reposition it. The segment path updates in real-time as you drag, and the total distance is recalculated automatically.
- Delete - Right-click on any point to instantly remove it from the segment. There is no confirmation dialog, so the point is deleted immediately. Works on any point including endpoints.
- Insert - Between every two adjacent points, there is a small semi-transparent midpoint. Drag this midpoint to create a new point at that location. This allows you to add detail to any part of the path, not just at the end.
- Split/Partial Delete - Double-click on any intermediate point (not the first or last) to open a dialog with two options: split the segment into two, or delete multiple points in a chosen direction.
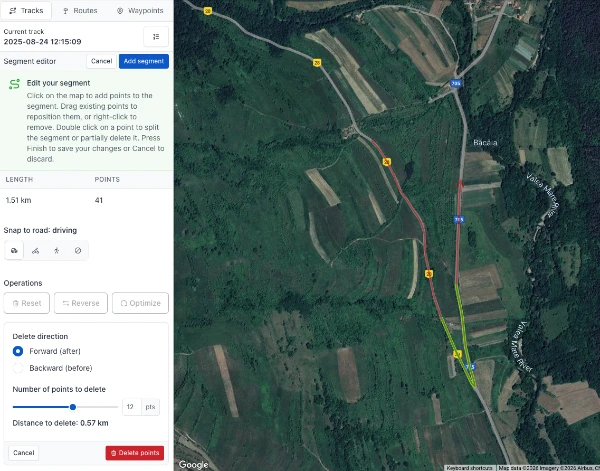
Split & Partial Delete
Double-click any point (except first/last) to open a dialog with two options:
- Split - Divides the segment into two separate segments at the clicked point. The clicked point becomes the last point of the first segment and the first point of the second segment. A confirmation dialog appears before splitting. After splitting, both segments appear in the segment list and edit mode is exited.
- Partial Delete - Opens a panel to remove multiple consecutive points from the segment. The original segment becomes dimmed while configuring.
Using Partial Delete:
- Choose direction - Select "Forward (after)" to delete points after the clicked point, or "Backward (before)" to delete points before it.
- Select how many points - Use the slider or number input to choose the number of points to delete. The range adjusts automatically based on the direction and available points.
- Preview - A green highlighted line shows exactly which section will be deleted. The distance of the section to be removed is displayed below the slider.
- Confirm - Click "Delete" to remove the selected points. The double-clicked point itself is always preserved.
Segment Tools
- Reset - Clear all points from the segment
- Reverse - Flip the direction of the segment
- Optimize - Reduce the number of points by setting a minimum distance threshold. Points closer than the threshold to the previous kept point are removed. A preview shows before/after point counts.
Press Finish / Add segment to save changes or Cancel to discard.
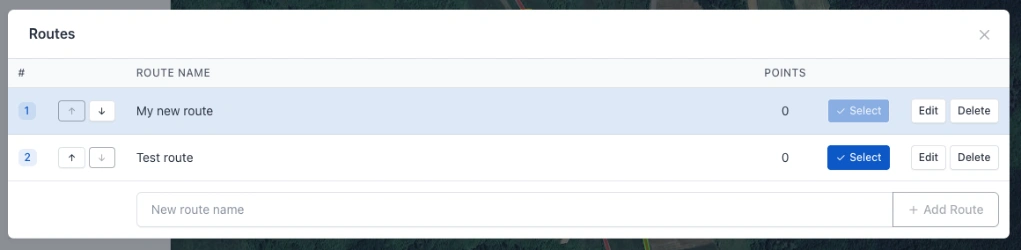
Route Management
The Routes tab manages your routes and their waypoints.
Managing Routes
Click to open route management where you can create, rename, delete, and reorder routes using the up/down controls.
Route Waypoints
Shows waypoints of the active route. Each waypoint has:
- Center - Center the map on this waypoint
- Edit - Edit waypoint data
Click to reorder waypoints within the route using up/down buttons. Select multiple waypoints for bulk move or delete operations.
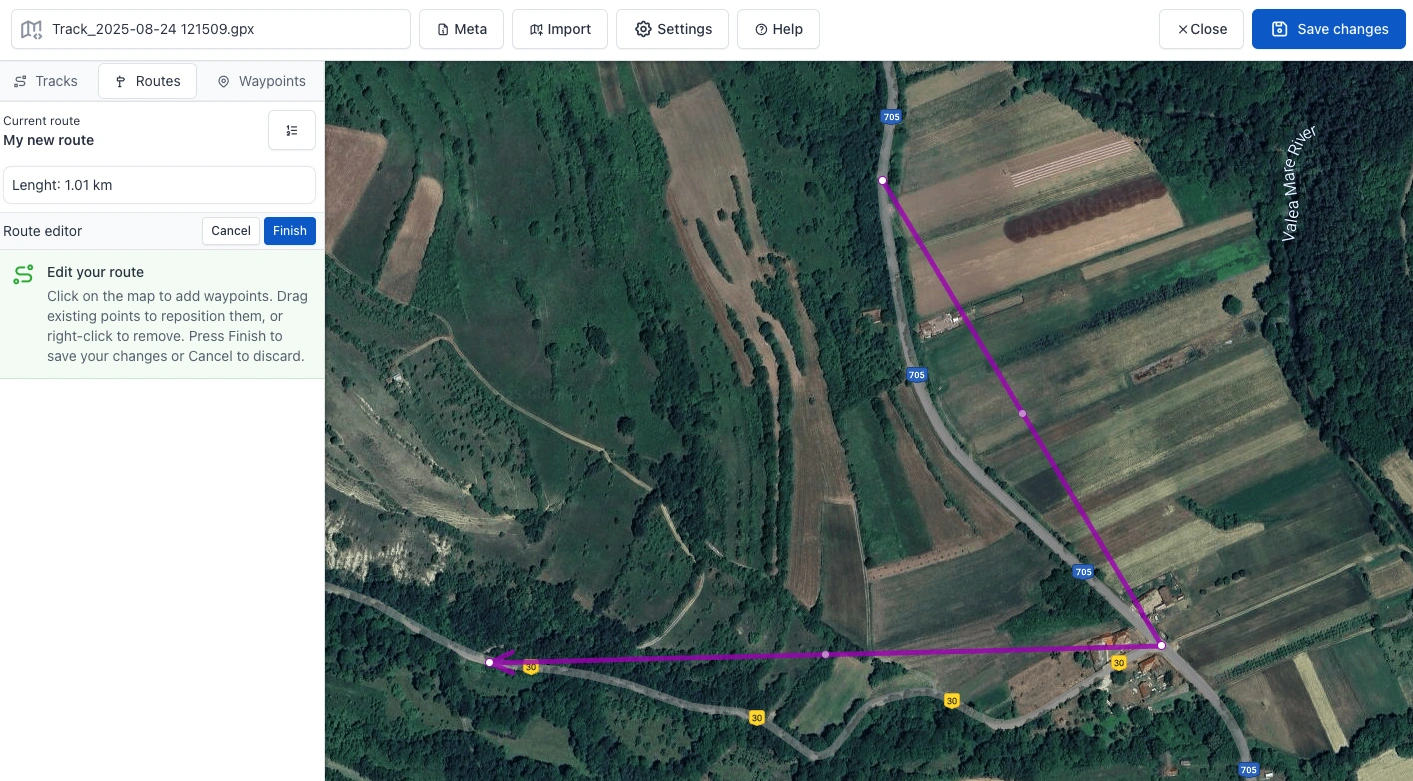
Route Editing
Click Edit route to start editing. Each point on the editable path represents a route waypoint.
- Add points - Click on the map to add route waypoints
- Move points - Drag any point to reposition it
- Delete points - Right-click to remove a point
- Insert points - Drag intermediate points to add new waypoints
Press Finish to save the route or Cancel to discard changes.
Route Point Data
Click a route point on the map or use to edit its data. Available fields include:
- General - Name, type, time, source, comment, symbol, description
- Location - Latitude, longitude, elevation
- Links - Associated URLs
- Advanced - Fix type, satellites, magnetic variation, DOP values, geoid height, DGPS info
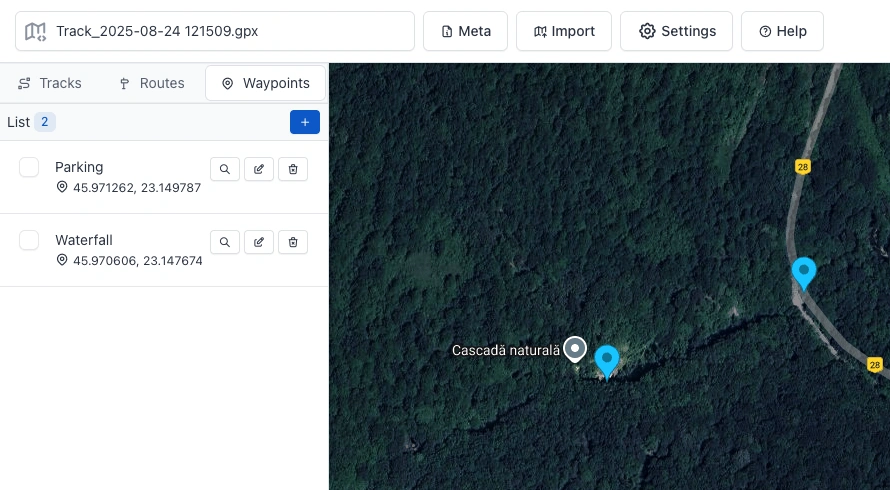
Waypoint Management
The Waypoints tab manages standalone waypoints (points not associated with routes). Each waypoint is displayed on the map as a blue marker.
Waypoint List
In the sidebar, each waypoint has:
- Center - Center the map on this waypoint
- Edit - Edit the waypoint
- Delete - Remove the waypoint
Select multiple waypoints to move them to a route or delete in bulk.
Adding/Editing Waypoints
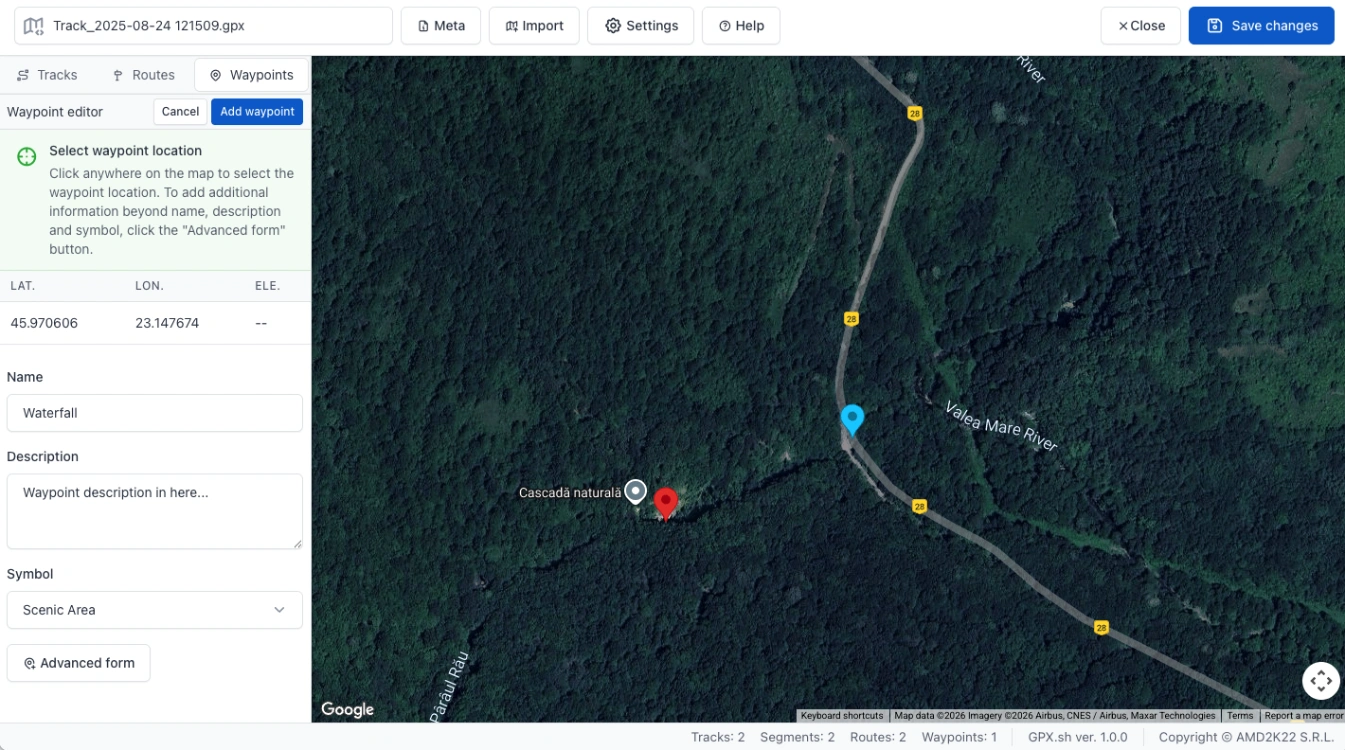
Click to add a new waypoint or to modify an existing one:
- Click on the map to set the location — the waypoint being edited is indicated by a red marker for clear visibility
- Enter name and description
- Select a symbol from the dropdown
- Click Advanced form for additional GPX 1.1 fields
Advanced Waypoint Fields (GPX 1.1)
The advanced form provides access to all GPX specification fields:
- Elevation - Height above sea level
- Time - Timestamp for the waypoint
- Source - Origin of the data
- Comment - GPS comment
- Type - Classification of the waypoint
- Fix Type - GPS fix type (none, 2d, 3d, dgps, pps)
- Satellites - Number of satellites used
- HDOP, VDOP, PDOP - Dilution of precision values
- Magnetic Variation - Magnetic declination
- Geoid Height - Height of geoid above WGS84 ellipsoid
- DGPS Age - Age of DGPS data
- DGPS Station ID - ID of DGPS station
- Links - Associated URLs with type and text
Map Display
The map uses color coding to distinguish between element types:
- Red lines - Track segments
- Purple lines - Routes
- Blue markers - Waypoints
Click any element on the map to view its details. An Edit button in the popup allows you to start editing that element.
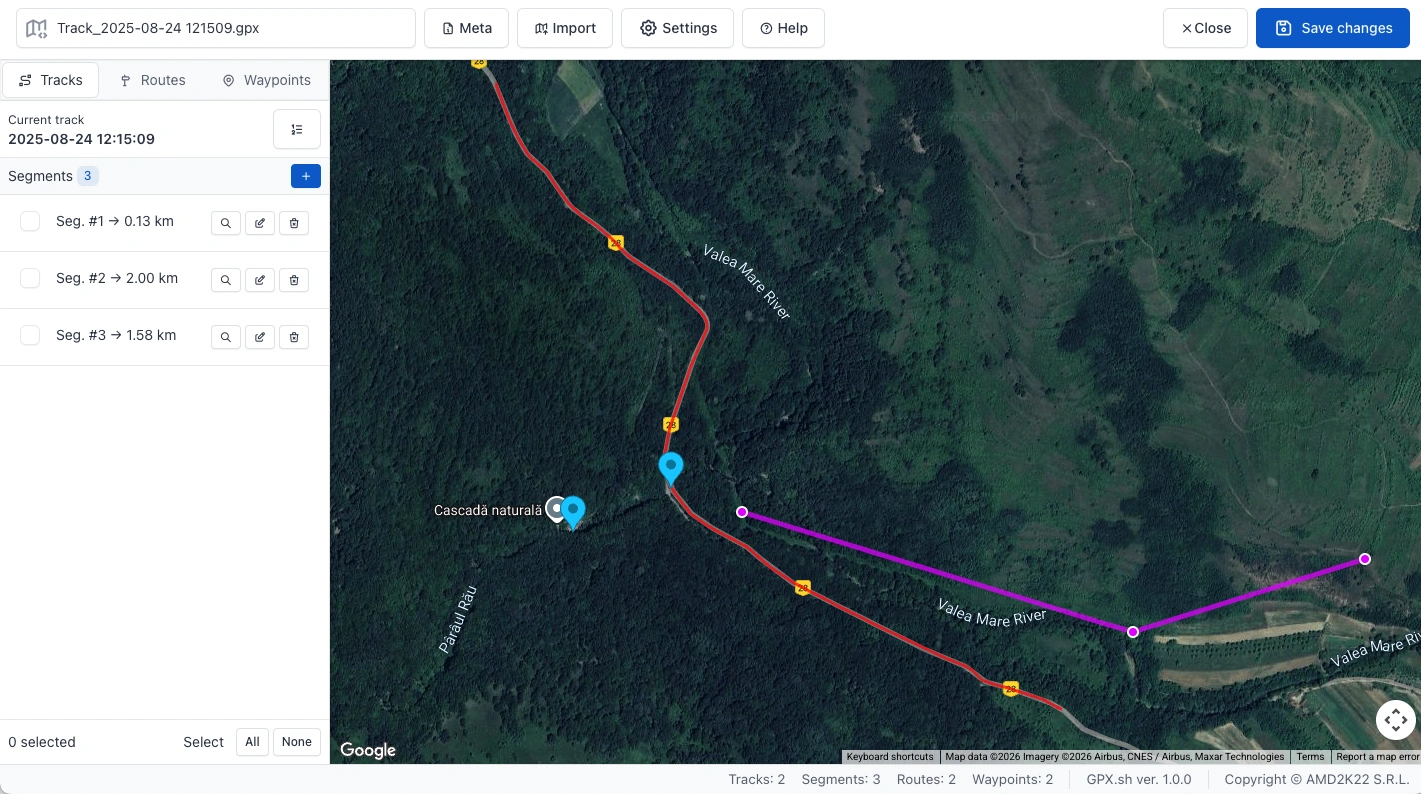
Footer
The editor footer displays:
- Left side - Contextual information and tips
- Right side - File statistics (number of tracks, segments, routes, and waypoints)